
Thursday, June 30, 2016
Hi
Hello there! I'm up on the Drive By Crafts blog today sharing a cutie patootie card using my favorite Doxie from Avery Elle's Skating By stamp set and the beautiful Hero Arts Paper Layering Palm Tree Pair. To find out how I made my card pop on over there now!

Wednesday, June 29, 2016
How Ya Bean?
Happy hump day, friends (that's Wednesday in case you didn't know lol)! I'm here today with a card I made for the Essentials by Ellen June Pin-Sights Challenge at Ellen Hutson! Just look at this fun, colorful graphic:

I was drawn to all the lovely color in this picture, and decided to use it on my card!

I started with the plaid Lawn Fawn patterned paper and some washi tape to add some pink, teal, and yellow to my card. For the addition of the purple I watercolored the cute coffee cup and heart steam from OH FRAPPE using my Zig Clean Color Brush watercolor pens. I added some glossy accents to the coffee and some clear Wink of Stella to the cup and heart.

The sentiment is from OH FRAPPE and I stamped it on a thin flag banner. To finish the card I added Pretty Pink Posh sequins in various colors from the card to tie everything together.
Thanks for stopping by, I'll be back tomorrow with a card for Drive By Crafts, hope to see you then!
Tuesday, June 28, 2016
Waving hello
Popping in today with a quick card using Reverse Confetti products that I'll be entering in the current CAS(E) This Sketch Challenge.

One of the reason I love simple sketches like this is that they force me to keep my card simple. So often when I'm making a card I want to keep adding more and more to it, because something doesn't seem "quite right". Yet so often I see really pretty clean and simple cards online and I'm always envious of the designers ability to STOP, with very few, but perfectly placed elements on the card! The card I made today was super easy to make, just a few elements on it, and I love how it looks!


To make this card I first did a bit of ink blending on a white card base using distress inks (Tumbled Glass and Broken China). Next I used the Scalloped Tag Layer Confetti Cuts from Reverse Confetti to cut a tag and used that as a "stencil", and sponged on some Peacock Feathers distress ink. I added a few water drops and some black paint splatters to the card and then stamped the sentiment from Seaside. I stamped the octopus from Seaside using Wplus9 Little Piggy ink and cut it out with the coordinating Seaside Confetti Cuts. I popped up the octopus on some foam dimensional tape, and finished the card with a few clear dew drops and some Glossy Accents. Quick and easy card, but oh so cute :)
Saturday, June 25, 2016
CAS-ual Fridays and Imagine Crafts Blog Hop!
Hello there, so glad you stopped by today! CAS-ual Fridays and Imagine Crafts are having a blog hop! The Girl Fridays were given the opportunity to work with some amazing Imagine Crafts products, and I'm excited to show you the projects I created. Let's get started, shall we?!

This first card uses VersaColor pigment inks, VersaFine ink, and Sponge Daubers. I own mostly all dye inks, but there are SO many cool techniques that you can do with pigment inks that I knew I wanted to start to build a collection of them. I love that the Imagine Crafts VersaColor pigment ink pads come in both regular size and mini, I'm going to collect the mini's so I can get all the colors!

Along with the Imagine Crafts products I used two CAS-ual Fridays stamp sets on this card, Pretty Posies and Wonderful Words. To make my card I started by stamping the flowers and leaves using VersaFine Black Onyx ink. This ink stays wet for just a bit so if you work quickly you can add clear embossing powder on top of it and emboss, and that's what I did here. I wanted to make sure I had no smudging whatsoever when I blended the pigment ink and embossing will ensure that. Next I used the VersaColor pigment inks and Sponge Daubers to add color to my flowers and leaves, dabbing and blending to create the look I wanted. For the large flower in the center I used Petal Pink, Orchid, and Boysenberry, for the medium flowers I used Canary and Orange, for the small flowers I used Sky Blue, and for the leaves I used Fresh Green and Green. I love how you can easily blend these inks to add several colors to your stamped images. Next I cut out the flowers and leaves using Posies Fri-Dies. Because pigment inks stay wet for awhile the next thing I did was add clear embossing powder on top of the flowers and leaves and embossed them. This adds a delicious SHINE to these flowers that I just love!! I tried to capture that shine in my close up shots, I hope you can see it.

I love shine and bling on my cards, and often use Glossy Accents to coat my projects, but I wouldn't want to do that with all of these flowers and leaves, so this technique is a perfect way to add some shine to your cards and really make them stand out! I arranged the flowers and leaves on the card, stamped the sentiment and added some clear sequins to finish it.
Another thing that pigment inks are fabulous for is stamping on Kraft cardstock!

For this card I used Bold Wishes and Sassy Smiles stamp sets. The pigment ink colors I used here are Orange, Fresh Green, and Orchid. I will tell you that the very lightest pigment ink colors don't show up quite as vividly on Kraft as the brighter, medium shades, like the ones I used here, although you can still see them. But I love how these colors look on the Kraft paper, don't you?!

I embossed the tiniest images using white embossing powder to make them stand out a bit more, and I did some selective stamping to make the "my" "friend" labels (the actual stamp says "you're my best friend"). As you probably know by now I love mixing and matching sentiments to say exactly what I want to say :)
This is a hop, so of course there are prizes involved! Be sure to comment on each stop along the way in order to be eligible to win one of the two FABULOUS prizes being offered!!
The next stop on the hop is the talented RONI JOHNSON!
Thursday, June 23, 2016
Reverse Confetti Inspiration Station Sneak Peek!
Hello there! Are you signed up for the Reverse Confetti Newsletter? If not, you'll want to go do that now. It comes out every Friday, and tomorrow I'll be featured in the Inspiration Station! The newsletter is the only place you'll be able to see my card, but I'll show you a peek here to wet your appetite :)

I was inspired by a photo I saw in an Etsy shop. To get all the details be sure to sign up for the newsletter!

I was inspired by a photo I saw in an Etsy shop. To get all the details be sure to sign up for the newsletter!
Happy Birthday
Hello, friends! I'm up on the Drive By Crafts blog today using a couple of fun stamp sets from Avery Elle!
I hope you'll pop over there and check out the details!


You are loved
Hello there my sweet crafty friends! I'm up on the CAS-ual Fridays blog today with a card that uses several stamp sets and Fri-Dies. I love how well CAS-ual Fridays stamps and dies "play" together!

To make my card I started by cutting the hearts from Heartboard Fri-Dies out of a piece of white card stock. I cut one heart then cut a second, overlapping them. I was able to "fill in" the overlap by using the largest heart, insetting it in the heart on the left. I wanted some watercolor to peek through the hearts so I used some distress inks underneath to achieve that (Tumbled Glass, Broken China, and Peacock Feathers). I added a few water drops and some Peacock Feather splatters to the background too. I popped up the white panel with the die cut hearts using some foam dimensional tape. The sentiment is made from 3 different stamp sets. "hey there" is from Girlfriend, "girl" is from Calling All Sistahs, and "you are loved" is from Hope Ribbon. I love being able to make unique sentiments like this by mixing and matching! I added a few gold glitter hearts to my card (cut using Heartboard Fri-Dies), along with a scalloped gold border. The arrow is also from Heartboard Fri-Dies, I cut it from black card stock and added some glossy accents on top of it. A bit of washi tape finishes things up.

I hope you're inspired to mix and match some of your CAS-ual Friday stamp sets, I'd love to see what you make! If you're interested in purchasing any of the supplies I used today I have a discount code for you!
Friday, June 17, 2016
Calling All Sistahs Blog Hop
Hello my sweet crafty friends! Today I'm participating in the Calling All Sistahs Blog Hop. This is a blog hop started by Michele, the owner of CAS-ual Friday Stamps,
to remind all of the sistahs out there to do their monthly breast
self-exams and have their yearly mammograms. We cherish all of you and
wouldn't want to lose a single one of you to this terrible disease!

To make my card today I started with a piece of watercolor paper which I taped down on a wood board to help keep it flat. I used my Kuretake Gainsai Tambi watercolors to paint rainbow stripes. I added some water droplets to the card to pull up some of the color (the white splotches). When it was completely dry I used the Hope Ribbon and Calling All Sistahs stamp sets to do some white embossing. I added a few little hearts that I cut from Fun-Fetti Fri-Dies to my card and coated them with glossy accents. Very simple card but the message is so important, Girl, get 'em squeezed!
The CAS-ual Friday store has a wonderful line of stamps, the Calling All Sistahs line, to help you get the word out to your friends and family. 50% of the profits from the sales of the Calling All Sistahs line goes to National Breast Cancer Foundation, Inc. for research & medical help!
I hope that you'll hop along with us! There will be a $15.00 gift certificate to the CAS-ual Fridays store given to 3 people who comment along the hop.
The next stop on the hop is PENNY WARD!
CASual Fridays Stamps http://cas-ualfridaysstamps.
Shona Chambers: http://twinearound.blogspot.
Lori McAree
http://smilingwhilestamping.
Nora Noll: http://acreativetouch.
Claire Apostoloff
http://lifeonthescrapheap.
Lisa Lahiff: http://lisascreativeniche.
Lydia Evans: http://lydiaevansdesign.com/
Ceal Pritchett
Simplybeautifulcreations.
Vicki Dutcher - http://allidoisstamp.blogspot.
Kimberly Rendino: http://kimpletekreativity.
Susan White http://susansstampingblog.
Kelly Griglione: http://notablenest.blogspot.
Alanna Moses
http://www.damoses.blogspot.
Joanna Harty: http://www.hartybyheart.com/
Jeanne Jachna
http://akeptlife.blogspot.com/
Jennifer Ingle:
http://justjingle.blogspot.
Lisa Harrolle
http://lisaembellishmyworld.
Diane Jaquay:
http://dmjaquay.blogspot.com/
Penny Ward
http://www.pennywardink.com
Bonnie Sharp:
http://theluckyclucker.
Lori Kobular
http://loriskreations.
Archana Bhurke:
http://handmadecardsbyarchana.
Sue Nagata
http://foleysfriend.blogspot.
Kim Sherrod
www.lilypatchstamps.com
Heather North
https://
Thursday, June 16, 2016
You're fabulous!
Hello friends! I'm up on the Drive By Crafts blog today using some FUN summer products from Hero Arts, the Color Layering Flamingo stamp set and the Paper Layering Palm Tree Pair. When you combine these products with Elle's Studio: Sunny Days Paper Pack you can't help but make a summertime happy card!

Hop on over to Drive By Crafts to read all the details of how I made this card!

Hop on over to Drive By Crafts to read all the details of how I made this card!
Snappy Birthday
Hello! I'm here today with a card using the Reverse Confetti Sketch For You To Try #37. Have you played along yet? There's still plenty of time, you have until noon CST on the 29th to enter the challenge. The winner will receive a $20.00 gift certificate to the Reverse Confetti store and claim the title of 'Fetti Fave!


I made a shaker card using Seaside and Seaside Confetti Cuts. I just love the adorable little crab in this stamp set, doesn't it look cute in the shaker windows?! To make the card I used a circle die from Detailed Circles Confetti Cuts to make the 2 windows, and to cut the sentiment circle. For the card base I used the Scalloped Cover Plate Confetti Cuts and embossed with it. Here's a close up where you can see it a little better.

The anchor was cut from shiny silver card stock using Seaside Confetti Cuts. I added some red and white polka dot ribbon from my stash to embellish the card.
I hope you'll play along with the June SFYTT, can't wait to see what you make!
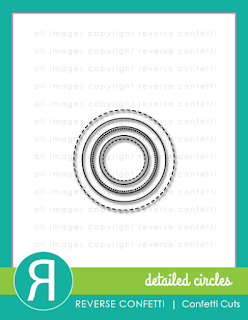


Monday, June 13, 2016
Congrats
Why hello there, so happy you stopped by! I have a card to share with you today that I made for 2 challenges, Winnie & Walter's The Gossip Column with Taheerah Atchia No. 4/Spectrum, and Virginia's View Challenge #22 All About Colors.


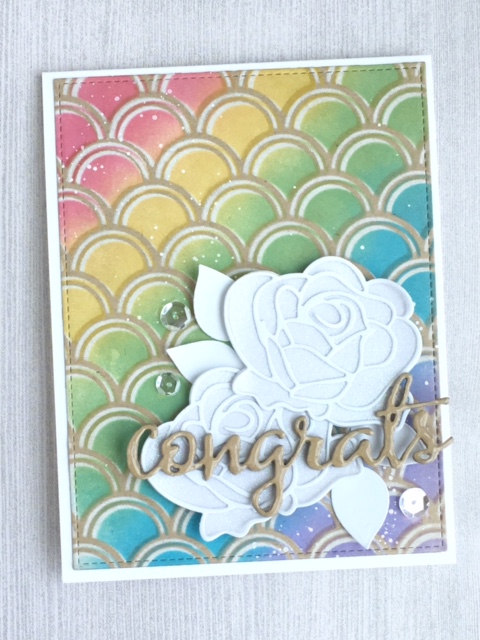
To make this card I started by using a sponge dauber and some white pigment ink which I applied through Winnie & Walter's Madison Creative Screenings stencil onto Kraft card stock. I wish I'd taken a picture so you could see that step but I didn't. All of the stencil openings were filled with the white ink though if you can picture that. I waited until the next day to add the color so that I knew the white pigment ink was completely dry (you could also hit it with your heat tool, you just want to make sure it's dry). I placed the stencil back on the paper but this time I shifted it slightly so that some of the white pigment ink would show though. I believe this technique is called "ghosting". Next I applied a rainbow of distress inks to my card using an ink blending tool. The "colors" covered over most of the white area so it mutes them a bit, giving a very soft look. I die cut several roses and leaves using Winnie & Walter's In Bloom: Maggie's Roses Cutaways. You can't see it in this picture but for the solid bottom layer of the roses I used white glitter paper, it looks so gorgeous in real life! I cut 4 of the word "congrats" (also from Winnie & Walter), glued them together to create depth, and then topped it off with some glossy accents. Before I attached the roses and sentiment to my card I added some white paint splatters, I think this always adds so much to a colorful card like this. I finished my card with some Pretty Pink Posh clear sequins. I do love how this turned out and I think it will make a perfect wedding card.

To make this card I started by using a sponge dauber and some white pigment ink which I applied through Winnie & Walter's Madison Creative Screenings stencil onto Kraft card stock. I wish I'd taken a picture so you could see that step but I didn't. All of the stencil openings were filled with the white ink though if you can picture that. I waited until the next day to add the color so that I knew the white pigment ink was completely dry (you could also hit it with your heat tool, you just want to make sure it's dry). I placed the stencil back on the paper but this time I shifted it slightly so that some of the white pigment ink would show though. I believe this technique is called "ghosting". Next I applied a rainbow of distress inks to my card using an ink blending tool. The "colors" covered over most of the white area so it mutes them a bit, giving a very soft look. I die cut several roses and leaves using Winnie & Walter's In Bloom: Maggie's Roses Cutaways. You can't see it in this picture but for the solid bottom layer of the roses I used white glitter paper, it looks so gorgeous in real life! I cut 4 of the word "congrats" (also from Winnie & Walter), glued them together to create depth, and then topped it off with some glossy accents. Before I attached the roses and sentiment to my card I added some white paint splatters, I think this always adds so much to a colorful card like this. I finished my card with some Pretty Pink Posh clear sequins. I do love how this turned out and I think it will make a perfect wedding card.
Thursday, June 9, 2016
Miss you
Greetings, friends! I'm up on the Drive By Crafts blog today with a sweet card using the Paper Smooches Adorable Array Die and Elle's Studio: Little Moments 6x6 Paper Stack, check it out HERE! I'm also entering my card in the Paper Smooches June Challenge: LAYERS.


Wednesday, June 8, 2016
Reverse Confetti June Release Blog Hop!
Hello again, it's time for the Reverse Confetti June Release Blog Hop and I'm so happy you stopped by to join us! The Confetti Crew has lots more wonderful inspiration to share with you today
and I hope you'll hop along with us! The June Release is available NOW in the Reverse Confetti store, YAY!

For my first card I decided to make a shaker. I don't make very many of these but I thought that the little images from MERMAID KISSES would make wonderful fillings for a shaker card!

To make my card I used the large scallop die from Circles n' Scallops Confetti Cuts to cut an opening on white card stock, then I used the dies again to cut one of the June QUICK CARD PANELS (the yellow polka dot). I used another of the QUICK CARD PANELS inside my shaker. I stamped and Copic colored lots of the little images from MERMAID KISSES and cut them out with the MERMAID KISSES Confetti Cuts. I just love the sweet little jellyfish, don't you?! I googled "jellyfish" to see pictures of them, I always thought they were pink, but they actually come in different colors, including an aqua color which is what I used to color mine. To make the softly sponged pink scallops on my card I used the SCALLOPED TAG LAYER Confetti Cuts to cut some thin paper and I used it as a stencil. I just love how this card turned out. I think I need to make shaker cards more often lol!

For my next card I used the new SAND DOLLAR Confetti Cuts, along with MY HEART TRUSTS.

To make this card I first colored some watercolor paper using Distress Inks to make my background (Tumbled Glass, Broken China, Antique Linen and Tea Dye). I wanted a very loose, organic look, reminiscent of the ocean along a shoreline. Next I colored 2 smaller pieces of watercolor paper for the sand dollar, one using Tea Dye, Antique Linen, and a bit of Tumbled Glass, and the other using Brushed Corduroy. If you look at pictures of sand dollars they sometimes have shades of blue in them, and the 5 loop centers are darker than the outside. I stamped the sentiment from MY HEART TRUSTS with Versafine Onyx Black ink. I really do love how this card turned out, it's a bit different from my usual style, a bit more "artsy", but it was really fun to make!


Now it's time to hop along and see all of the wonderful creations from the Confetti Crew and our fabulous June Fetti Friend Vanessa Menhorn! Happy hopping!
Reverse Confetti blog http://reverseconfetti.com/blog/
Amy Kolling http://stamp-n-paradise.blogspot.com/...
Fetti Friend--Vanessa Menhorn http://wingsofabutterfly-vanessa.blogspot.com/...
Heather Pulvirenti http://heatherpulvirenti.blogspot.com/...
Diane Jaquay http://dmjaquay.blogspot.com/search...
Kay Miller http://myjoyfulmoments-kaym.blogspot.com/...
Amy Tsuruta http://tsurutadesigns.blogspot.com/...
Audrey Tokach http://pinkinkoriginals.blogspot.com/...
Amy Sheffer http://pickledpaperdesigns.blogspot.com/...
Sarah Gough http://thinkingstamps.blogspot.com/...
Leigh Penner http://leighpenner.blogspot.com/......
Laurie Schmidlin http://justgivemestamps.typepad.com/...
Susan Liles http://www.susiestampalot.com/searc...
Subscribe to:
Posts (Atom)