Sunday, August 7, 2016

Countdown to Confetti: Day 3

It's day 3 of the August Reverse Confetti countdown and I'm practically bursting at the seams to show you today's ADORABLE stamp sets!  To add to the excitement, the new products will be available in the Reverse Confetti Store tonight at midnight EST!


My first card uses the new Worm Wishes and Worm Wishes Confetti Cuts, along with the new ABC Cover Panel Confetti Cuts!


For this card I used the ABC Cover Panel Confetti Cuts as an embossing plate instead of cutting it out.  You've got to love products that can do double duty like this!  The embossing adds a nice subtle background for my card.  I stamped the worm, apple, and ruler from Worm Wishes on white card stock, then stamped the striped filler for the body with green ink and the polka dot filler for the apple with red ink.  I colored the worms face with a green watercolor marker and the stem and leaf of the apple with green and brown.  I cut everything out with the Worm Wishes Confetti Cuts.  I arranged the pieces on a Kraft base that I cut using the large scallop circle from Circles 'n Scallops Confetti Cuts.  I finished the card with a few sequins.


My next card uses Toucan of Friendship along with the matching Toucan of Friendship Confetti Cuts, and the new Circle Band Confetti Cuts.


To make this card I started by making a "stencil" by cutting the leaf and pointed flower die from Toucan of Friendship repeatedly from a piece of thin white card stock.  I stenciled the leaves on some white card stock using 2 shades of green distress ink and an ink blending tool, and then I added some ink splatters to the leaves.  Next I cut the round band from Kraft card stock using Circle Band Confetti Cuts.  I used a plain circle from Circles 'n Scallops Confetti Cuts along with the stitched circle from Detailed Circles Confetti Cuts to cut the white circle that fits perfectly on the Kraft circle band.  I just love how Reverse Confetti products play so well together!  Next I stamped and colored the toucan and various leaves and flowers from Toucan of Friendship using Zig Clean Color watercolor markers.  I cut them all out using Toucan of Friendship Confetti Cuts and arranged them on my card.  I stamped the sentiment on black card stock and embossed in white, trimmed it and added it to my card.  I can't tell you how much I love this new stamp set, it's so fun to work with!


And last, but certainly not least, is Coffee and You and Coffee and You Confetti Cuts.  I also used the new Rounded Rectangle Band Confetti Cuts on my card.


Of course I love this because it's a coffee stamp set, but also because of the cute little mice and the adorable elephant (I'll be using the elephant on a card I'll be showing you tomorrow!)
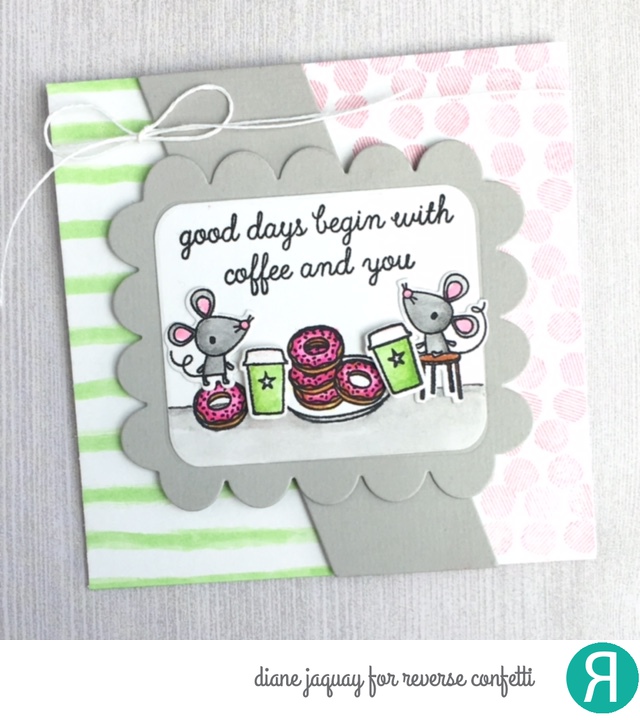


Well these little cuties are having quite the party, aren't they.  My donut days are over, but I can still party down with a good cup of joe lol!  This card is square, it measure 4 1/4 X 4 1/4.  To make the background I drew some stripes on one side using a light green Zig Clean Color watercolor marker, and on the other side I stamped the circles for the worms body from Worm Wishes using pink ink.  That stamp makes a wonderful background filler, doesn't it?!  I cut the Rounded Rectangle Band Confetti Cuts from grey card stock and placed it down the center of my card.  Next I cut the scalloped rectangle from Love Note from grey card stock and placed it on top of the rectangle band.  Then I cut a rectangle using Class Act Confetti Cuts from white card stock and placed that on the top to lay out my scene.  Like I said above, I really love how well Reverse Confetti products work together, Jen puts a lot of thought into everything she designs!  I stamped some of my scene directly on the white rectangle (the single donut and the plate of donuts), and colored them.  I drew a line to make a floor to ground the scene.  I stamped the mice and coffee cups on separate card stock, colored them with Zigs, and cut them using Coffee and You Confetti Cuts.  I stamped the sentiment with black ink and added a piece of white twine to finish the card.

So there you have it!  What do you think of everything that's releasing this month?  Personally I love it all!  You still have time to leave a comment on all of the design team blogs and on the Reverse Confetti Blog for a chance to win a 15.00 gift certificate to the Reverse Confetti store.  There's also a 15.00 prize up for grabs on the Reverse Confetti Facebook page so be sure to visit there too.  Please join us tomorrow for the August release blog hop where we'll be sharing more ideas for using the new products!  See you then!


Saturday, August 6, 2016

Countdown to Confetti: Day 2

Welcome back to day 2 of the Reverse Confetti August release countdown!  Today we're sharing a wonderful new sentiment stamp set called Forever In Our Hearts, and In a Jam stamp set and Jam Jar Confetti Cuts!


The sentiments in Forever In Our Hearts are really wonderful!  For this card I embossed the sunrise sentiment on vellum using gold embossing powder and cut it out with a basic circle die.  For the card base I used the Sunburst Cover Panel Confetti Cuts.  I first watercolored 2 separate pieces of watercolor paper using distress inks.  I cut the sunburst on the blue base and added the cut sunbeams from the orange piece into the open spaces of the blue piece, popping each sunbeam up with foam dimensional tape.  I used vellum tape to attach the sentiment, and finished the card with a few gold sequins.  I think the sunburst works perfectly with this sentiment, don't you?


I'm totally loving this adorable little jam jar!  For this card I used distress ink to watercolor the jar, khaki ink to stamp the label, and patterned paper for the jar lid.  They were all cut using Jam Jar Confetti Cuts.  I added a few tiny red sequins for the "cherries", and tied some twine around the lid.  Sweet as can be!  To make the card base I first did some stamping on white card stock.  Can you guess what I used to stamp the circles?  The teal centers were stamped with a pencil eraser and the red outline circles were stamped with a round pen cap!  I love how this turned out and I'm sure I'll be doing it again :)  I added a strip of the patterned paper across the bottom of the card, as a sort of table cover.  The frame around the outside was cut with the new All Framed Up Confetti Cuts from Kraft card stock.  Isn't that wavy stitched border fun?!

I hope you've enjoyed seeing my cards today. Be sure to leave a comment on all of the design team blogs and on the Reverse Confetti Blog for a chance to win a 15.00 gift certificate to the Reverse Confetti store.  There's also a 15.00 prize up for grabs on the Reverse Confetti Facebook page so be sure to visit there too.  Hope to see you again tomorrow!


Friday, August 5, 2016

Countdown to Confetti: Day 1

Hello there!  It's time for the August Reverse Confetti countdown, and this one is going to be very special because it's a double release!  That's right, because there was no release in July we've got twice the fun for you this month, and I know you're going to love the new products!


Today we have 2 new stamp sets, along with matching confetti cuts, to show you!  My first card uses Cute as a Button, Onsie Confetti Cuts, and a new die, All Framed Up Confetti Cuts.


To make my card I started by stamping the heart from Cute as a Button in a random pattern on white card stock using a very light grey ink.  I wanted a subtle background and this worked perfectly.  Next I cut the double stitched frames from All Framed Up in various pastel colors.  This new confetti cut is awesome, it cuts a number of different frame sizes and types, and I know I'll be using it a lot!  Next I stamped the "oh BABY" onesie using light blue ink, and die cut it with the Onesie Confetti Cuts.  I popped up the onesie on my card in the pink frame, and added a few pastel sequins around it.  I finished the card with some yellow and white baker's twine.  I really love the sentiments on these onesies!


My next card uses Just Brew It and Just Brew It Confetti Cuts, along with the new Big Stripes Tag Layer Confetti Cuts and Hang Ups, Too Confetti Cuts.


I'm just CRAZY about this new stamp set, because I'm crazy about coffee!  I love the big mug size and the fun sentiments on the mugs.  To make this card I started with a piece of white card stock and I used the stitched line die from Edge Essentials Confetti Cuts to add the stitched lines across the bottom of my card.  To make the tag I cut a black tag base using Topped Off Tag Confetti Cuts and topped it with the white layer cut with Big Stripes Tag Layer Confetti Cuts.  The tag topper was cut using Hang Ups, Too Confetti Cuts.  I cut off a piece at the top of my card at an angle and added one more stitched line across it.  True confession time, that was not part of my original design but I accidentally got a big smudge of black ink at the top of the card and rather than re-do the whole thing I cut off the smudged part and integrated it into the design by adding that stitched line.  I stamped the coffee cup with pink and brown ink and cut it using Just Brew It Confetti Cuts.  I finished the card with some black twine and some black and brown sequins.


Hope you like what you've seen so far, and just think, it's only day 1!  Be sure to leave a comment on all of the design team blogs and on the Reverse Confetti Blog for a chance to win a 15.00 gift certificate to the Reverse Confetti store.  There's also a 15.00 prize up for grabs on the Reverse Confetti Facebook page so be sure to visit there too.


Monday, August 1, 2016

Winnie & Walter Gift Certficate Winner


Hello there!  I used Random.Org to draw a winner of the $30.00 Winnie & Walter gift certificate that Shay so generously provided for my July Leading Lady performance, and the winner is:


Wow totally love your work with the stencils! So many various looks!


Congratulations, Lisa, I'll be contacting you about your prize!  

Heartfelt thank to everyone who took the time to leave me a comment!  Being a Leading Lady for Winnie & Walter has been a wonderful experience, thanks for sharing the journey with me!


Celebrate

Hello!  I'm here today sharing a card I made for the current CAS(E) this Sketch challenge using some fabulous Reverse Confetti products!


This sketch is so versatile, and I knew right away that I wanted to use some of my fun washi tape as a backdrop for the beautiful cake from Reverse Confetti's Candles 'N Confetti stamp set!


To make this I first added some strips of colorful washi tape to a white card base.  Next I stamped the cake plate and cake on white card stock and die cut them using Candles 'N Confetti Confetti Cuts.  I stamped the sprinkles on the cake, and the bow, both times using red ink, and die cut the bow.  I stamped the word "celebrate", from the Celebrations stamp set, on black card stock and embossed in white, and "it's your big day" on the card base.  To finish the card I added some Glossy Accents to the bow, and a few black enamel dots around the cake.


I love how this turned out, so festive and fun!