Monday, December 5, 2016

Countdown to Confetti: Day 1

Hello, sweet friends!  It's the most wonderful time of the month, I get to start giving you sneak peeks of the WONDERFUL new products being released from REVERSE CONFETTI!


Today's stamp set is certain to steal your heart!  It's called MOUSE MAIL, and of course there will be matching confetti cuts to go with it!


My card is very CAS, I wanted to highlight the adorable mice as much as possible.  I started by cutting a circle out of a piece of scratch paper and doing some ink blending inside the circle (I used Mowed Lawn and Salty Ocean distress inks and an ink blending tool).  I stamped and colored the mice using Copic markers, and die cut them using MOUSE MAIL Confetti Cuts.  I stamped the sentiment from MOUSE MAIL on black card stock and embossed with white embossing powder.  The hearts were cut from pink card stock using another new product, MAILBOX STARTER Confetti Cuts.


I have one more project to share using the new MAILBOX STARTER Confetti Cuts!  This die makes an adorable little 3D mailbox that can be used in many ways.  I decided to turn it into a Christmas ornament!


The MAILBOX STARTER Confetti Cuts makes the "base" of the mailbox, all you have to do is cut a piece of 3 1/2" X 1 3/4" paper to make the arched cover/top.  You could use patterned paper for that but I decided to stamp mine.  I cut a piece of white card stock to 3 1/2" X 1 3/4" and randomly stamped the letters from MOUSE MAIL.  I then colored them with some pastel colored Copic markers.  Since I knew I was making an ornament I punched a small hole in the center of the stamped piece and threaded some blue ribbon through, tying a knot on the inside.


I die cut the base piece using from BABY BLUE Card Stock using MAILBOX STARTER Confetti Cuts.  I also cut just the word "mail" from some white card stock and glued the letters over the blue to make the word stand out.


Here's a picture of the ornament hanging on my Christmas tree, isn't it cute?!!  Since the door of the mailbox can open and close you could fill these with little treats, or little love notes, the possibilities are as endless as your imagination!


We're off to an ADORABLE start with MOUSE MAIL and MAILBOX STARTER Confetti Cuts!  Be sure to leave a comment on all of the design team blogs and on the Reverse Confetti Blog for a chance to win a 15.00 gift certificate to the Reverse Confetti store.  There's also a 15.00 prize up for grabs on the Reverse Confetti Facebook page so be sure to visit there too.


Saturday, November 26, 2016

SFYTT #35

Hello, sweet friends, so happy to have you stop by today!  I'm sharing a card using the current Reverse Confetti Sketch For You To Try!


I've been making lots of Christmas cards and presents using my Reverse Confetti products, there are so many cute ones to choose from!


To make my card I started with a BRICK card stock base and added a strip of patterned paper from the VERY MERRY 6X6 paper pad, backing the piece with some AVOCADO card stock.  Next I cut 2 more pieces of patterned paper, the trees and the green polka dot which was cut using ALL FRAMED UP Confetti Cuts.  I stamped the moose from MERRY CHRISTMOOSE and colored him with Copic markers, then I die cut him using MERRY CHRISTMOOSE Confetti Cuts.  The snowflakes and sentiment are also from MERRY CHRISTMOOSE.  I added some red and white bakers twine to my card, and some glitter glue along the edge of the sentiment and on the snowflakes. 


I stamped the moose's scarf using BRICK Dye Ink and fussy cut it.  After I glued it onto the moose I added some glossy accents to it.  I love this little guy, he's very easy to color, which I love since I struggle a bit with my coloring.

Have you tried your hand yet with this month's sketch?  You still have a few more days, the link will be open until November 29th at noon CST.  The winner of the challenge will receive a $20.00 gift certificate to the Reverse Confetti store and claim the title of 'Fetti Fave!


Wednesday, November 23, 2016

25 Days of Christmas Tags - Reverse Confetti

Hello there!  I'm excited to be joining the rest of the Confetti Crew at Reverse Confetti today to share tags for Tracey McNeely's 25 Days of Christmas Tags event!


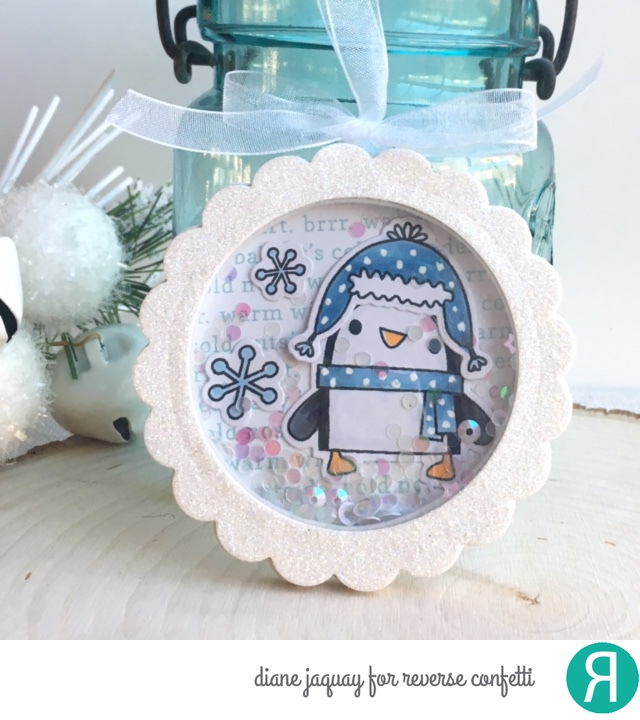
For my tag today I used the ever adorable S'MORE LOVE stamp set and S'MORE LOVE Confetti Cuts to make a shaker tag that can also be used as an ornament!


I started by die cutting a scalloped circle from white glitter card stock using CIRCLES 'N SCALLOPS Confetti Cuts.  I also cut some white fun foam, 2 pieces, to make my shaker.  The backing paper is from the WARM HEART 6X6 paper pad.  I didn't photograph the back of the tag but I added a piece of BABY BLUE card stock (also cut with the Circles 'N Scallops die) to the back.  It adds stability and you can write your "to" and "from", or whatever message you like, on the back.


I stamped the penguin, hat, and snowflakes from S'MORE LOVE and colored them with Copic markers, adding some white dots to the hat and scarf.  Next I die cut them using S'MORE LOVE Confetti Cuts and I added them to my shaker, along with filling from Pretty Pink Posh.

Be sure to comment on Tracey's blog on the 25 Days of Christmas Tags posts, there are LOTS of prizes being given away by the generous sponsors!  Also, Reverse Confetti is having a BLACK FRIDAY sale this weekend!  This is the perfect time to stock up on some of the items on your wish list and save 20%!


Tuesday, November 22, 2016

Happiest of Holidays

Hello!  I'm here today with a card I made for the current Winnie & Walter Rerun Challenge!


This month the Rerun Challenge is using Happiest of Holidays with Evelin T. Designs.  I adore all of Evelin T.'s designs and this is one of my favorites!


To make my card I first stamped Mini Scenery: Multigrain on a white card base with light gray ink.  The sentiment is stamped with dark gray ink.  I stamped the birds and holly stem on white paper and added a bit of color with some Copic markers.  I fussy cut the images and added them to my card.

I like to make some flat cards like this at Christmas because they're easier to mail :)

Thanks so much for stopping by today!

Sunday, November 20, 2016

Essentials by Elleln November Pin-Sights Challenge

Hello, my friends!  It's a cold, rainy day here in PA and I was in the mood to make a warm and cozy card.  The November Pin-Sights board over at Ellen Hutson was the perfect inspiration for that!


I don't own any of the Essentials by Ellen fall stamps or dies, so I went with more of a general holiday theme, not specifically Thanksgiving or Christmas, as I think the sentiment I used applies to the entire holiday season.  Definitely the most wonderful time of year to me!


I started with a piece of Distress Woodgrain Cardstock and did some ink blending using distress inks (Vintage Photo, Gathered Twigs, Brushed Corduroy, Tea Dye, and Antique Linen).  Next I added a piece of red gingham patterned paper to the base.   To make my tag I used a piece of cross stitch cloth and die cut it with a tag die.  I just love the texture this adds to my card.


I cut some sprigs using the WILD GARDEN dies to tuck behind my sentiment, which is from HOLLY JOLLY.  Picking up on the coffee pot that's in the inspiration photo (as if I ever need an excuse to add coffee to a card lol!), I stamped and die cut a coffee cup using OH FRAPPE and watercolored it with Barn Red distress ink.  I stamped the little tree using HOLLY JOLLY and Cracked Pistachio distress ink and fussy cut it.  The card is finished with a few red sequins and some red twine.  I love how this card came together, hope it inspires!


Saturday, November 19, 2016

25 Days of Christmas Tags - Concord & 9th

Hello there!  Today I'm joining in with the 25 Days of Christmas Tags event using Concord & 9th products!


I made 2 tags today using the BAGS & TAGS DIES!  I love that you can adjust the length of your tags to accommodate the stamps and die cuts you plan to use, as I did for my 2 examples.


The bear holding the sign is tall, and I was able to cut my tag to fit it's size thanks to the BAGS & TAGS dies.  Pretty cool, huh? 


To make the tag above I used the O CHRISTMAS TREE stamp set.  I stamped the garland with red ink.  It's a small stamp, but very easy to repeat stamp it to make any kind of garland you like.  I stamped the ornaments with gray ink to make them look like they're hanging from the garland, and I colored them with Zig Clean Color watercolor markers.  I stamped the sentiment and stars with gray ink, and I sponged some gray ink around the edges of the tag.


I used the bear from the HUGS stamp set and stamped on Kraft card stock, embossed it with white embossing powder, and fussy cut.  I stamped "joy" on the bear's sign using the BANNER ALPHA BITS stamp set.  I added a few die cut sprigs of greenery that I cut using TAKE A BOUGH dies.  To finish this tag I added a few wood stars.

Be sure to comment on Tracey's blog on the 25 Days of Christmas Tags posts, there are LOTS of prizes being given away by the generous sponsors!


Thursday, November 17, 2016

Reverse Confetti Crazy For Christmas - Decor & More

Welcome back to day 3 of the Reverse Confetti Crazy For Christmas event!  Today we're focusing on Decor & More!


For my project today I took a Christmas decoration that I've owned for over 20 years and updated it with some adorable Reverse Confetti products!


I didn't think of taking a picture of what was in this frame previously, but it was a rustic picture of various Santa's lined up in a row.  The outer edge of the frame measures 7 3/4" X 6 1/4".  To update the piece I first measured the inside opening and cut a piece of white Strathmore Bristol smooth watercolor paper to that size and did some ink blending using Wilted Violet and Peacock Feathers distress inks.  Next I added some water splatters to the piece.  I cut a piece of white glitter paper, curving the edge, and glued it across the bottom of the picture.  At this point I inserted the paper in the frame opening.


Next I stamped the images from S'MORE LOVE and MERRY CHRISTMOOSE and colored them with Copic markers.  I die cut the colored images using S'MORE LOVE Confetti Cuts and MERRY CHRISTMOOSE Confetti Cuts, and added them to the base using foam dimensional tape.


I die cut a bunch of snowflakes from white glitter card stock using the snowflake trio die from MERRY CHRISTMOOSE Confetti Cuts.  It's pretty easy to separate the snowflakes with a few snips of a scissors, which is what I did here.

I had so much fun making this and now I have to decide if I want to gift it or keep it for myself :)  I hope you'll visit the rest of the Confetti Crew to see what they've created, I know they'll have some fantastic ideas for you!